Introduction
RBD (RADOS Block Device) is a Red Hat Ceph Storage service that provides block storage. It allows users to mount storage as a virtual block device, much like a physical hard drive, making it an ideal choice for providing disk space to virtual machines and even as Kubernetes/OpenShift volumes.
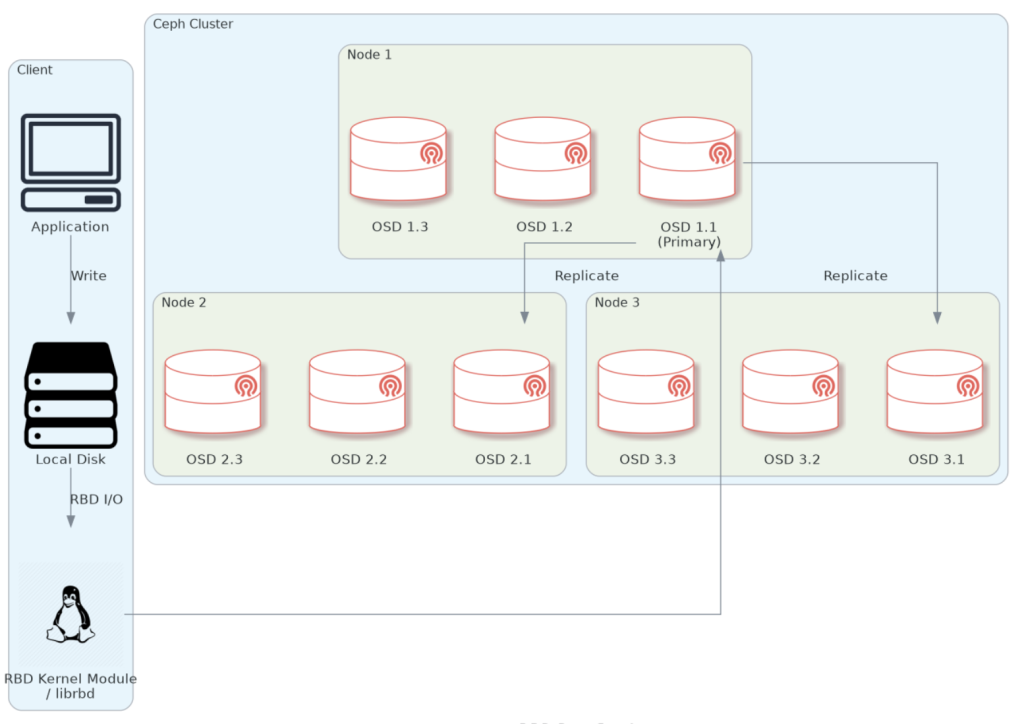
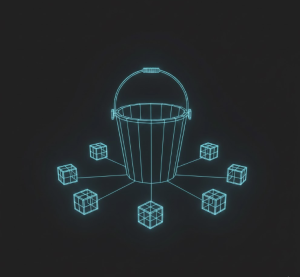
Diagram of the end-to-end data flow-path when using RBD with Ceph
NOTE: The node/OSDs mumbers are arbitrary.
This guide assumes you have a Red Hat Ceph Storage cluster set up. If not, check out our other guide on How to Deploy a Red Hat Ceph Storage Cluster in an Air-gapped Environment.
In the following section, we will showcase how to deploy RBD storage solution on a Red Hat Ceph Storage cluster. This will be done on our bastion, acting as the client node.
Procedure
Create an RBD pool and volume
On node1, enter the Ceph shell and create an RBD pool and volume.
[root@node1 ~]# cephadm shell
[ceph: root@node1 /]# ceph osd pool create octopuscs-rbd-pool
pool 'octopuscs-rbd-pool' created
Initiate the rbd pool and create a new volume. Set the size to 30GiB for example.
[ceph: root@node1 /]# rbd pool init octopuscs-rbd-pool
[ceph: root@node1 /]# rbd create --size 30G --pool octopuscs-rbd-pool octopuscs-volume
[ceph: root@node1 /]# rbd ls --pool octopuscs-rbd-pool -l
NAME       SIZE    PARENT  FMT  PROT  LOCK
octopuscs-volume  30 GiB            2
Exit the Ceph shell, and enter it again, this time with a mounted volume to create a new RBD client keyring:
[ceph: root@node1 /]# exit
[root@node1 ~]# cephadm shell --mount /etc/ceph/
[ceph: root@node1 /]# ceph auth get-or-create client.octopuscs-rbd \
 mon 'profile rbd' osd 'profile rbd' \
 -o /mnt/ceph.client.octopuscs-rbd.keyring
[ceph: root@node1 /]# exit
Connect to rbd as a client
Copy the the required files to the target client node. We are going to use bastion as our client node for the demonstration.
[root@node1 ~]# scp /etc/ceph/{ceph.client.octopuscs-rbd.keyring,ceph.conf} root@bastion:/root
[root@node1 ~]# scp /usr/bin/cephadm root@bastion:/usr/bin
On our RBD client node, Enable and install the required repositories.
[root@bastion ~]# subscription-manager repos \
--enable codeready-builder-for-rhel-9-$(arch)-rpms
[root@bastion ~]# dnf install -y \
https://dl.fedoraproject.org/pub/epel/epel-release-latest-9.noarch.rpm
[root@bastion ~]# /usr/bin/crb enable
Install the Ceph client packages:
[root@bastion ~]# cephadm add-repo --release squid
[root@bastion ~]# dnf update -y
[root@bastion ~]# dnf install -y ceph-common
[root@bastion ~]# ceph -v
ceph version 19.2.3 (c92aebb279828e9c3c1f5d24613efca272649e62) squid (stable)
Enable the RBD kernel module, and copy the ceph files to /etc/ceph
[root@bastion ~]# modprobe rbd
[root@bastion ~]# mv ~/ceph.* /etc/ceph
Next, map the Ceph RBD pool/volume to our local machine as a disk.
[root@bastion ~]# rbd -n client.octopuscs-rbd device map \
–pool octopuscs-rbd-pool octopuscs-volume
/dev/rbd0
Check that the rbd is mapped:
[root@bastion rbd-test]# rbd showmapped
id pool namespace image snap device
0 octopuscs-rbd-pool octopuscs-volume – /dev/rbd0
Format the disk in your required file format. Then, mount it onto a directory.
[root@bastion ~]# mkfs.ext4 /dev/rbd0
[root@bastion ~]# mkdir -p /mnt/ceph-rbd
[root@bastion ~]# mount /dev/rbd0 /mnt/ceph-rbd
[root@bastion ~]# df -h | grep rbd
Filesystem             Size  Used Avail Use% Mounted on
/dev/rbd0              20G   24K  19G   1% /mnt/ceph-rbd
Write and Test data
In this section, we will test the RBD. We will write data to in one node, then mount the same RBD in another node. We will check if the data is not corrupted. For that, we are going to need ~20 GiB of free storage space on the node, and ~20 GiB storage space in the Ceph cluster.
Download using ‘curl’ the following file to the first node. It’s a ~1MiB text file containing the first one million digits of Pi.
[root@bastion ~]# curl https://ceph.co.il/wp-content/uploads/2026/01/pi-digits-1m.txt > pi-digits-1m.txt
[root@bastion ~]# ll -h
-rw-r--r--. 1 root root 977K Jan 26 10:17 pi-digits-1m.txt
Create a 20 GiB file from the original one. This might take a few minutes to complete.
[root@bastion ~]# touch pi-digits-1m-20gb.txt
[root@bastion ~]# for i in {1..20500}; do \
cat pi-digits-1m.txt >> pi-digits-1m-20gb.txt; \
echo "" >> pi-digits-1m-20gb.txt; done

[root@bastion ~]# ll -h
-rw-r--r--. 1 root root  20G Jan 26 10:27 pi-digits-1m-20gb.txt
-rw-r--r--. 1 root root 977K Jan 26 10:17 pi-digits-1m.txt
Generate a checksum for the file. This might take a few minutes to complete.
[root@bastion ~]# sha1sum pi-digits-1m-20gb.txt | \
cut -f 1 -d " " > pi-digits-1m-20gb-checksum
[root@bastion ~]# cat pi-digits-1m-20gb-checksum
6514c40f8dab7ac44dba22623c25eb4a571d209f
Next, move the 20GiB file to the mounted RBD directory.
[root@bastion ~]# mv pi-digits-1m-20gb.txt /mnt/ceph-rbd/Then, unmount and unmap the RBD image. This might take a few minutes to complete.
[root@bastion rbd-test]# umount /mnt/my-rbd
[root@bastion rbd-test]# rbd unmap /dev/rbd0
Check the mapping (should show no output):
[root@bastion rbd-test]# rbd showmappedDownload the required packages and tarball them. We are going to use node1 for our second RBD client.
[root@bastion rbd-test]# mkdir -p ~/ceph-cluster-packages/rbd-clients-packages/ceph-common && ~/ceph-cluster-packages/rbd-clients-packages/ceph-common
[root@bastion ceph-common]# dnf download -y ceph-common --resolve --alldeps
[root@bastion ceph-common]# cd .. && tar -cvzf ceph-common.tar.gz ceph-common/
Copy the tarball to the target node, then SSH into it.
[root@bastion rbd-clients-packages]# scp ceph-common.tar.gz root@node1:/root
[root@bastion rbd-clients-packages]# ssh node1
Extract the tarball and install the packages.
[root@node1 ~]# tar -xvzf ceph-common.tar.gz ceph-common/ && cd ceph-common
[root@node1 ~]# dnf install -y ./*.rpm --skip-broken
[root@node1 ~]# ceph -v
ceph version 19.2.3 (c92aebb279828e9c3c1f5d24613efca272649e62) squid (stable)
Enable the RBD kernel module. This loads the RBD drivers into the Linux kernel and enables RBD features on the system.
[root@node1 ~]# modprobe rbdThen, map and mount the disk onto a directory.
[root@node1 ~]# rbd -n client.octopuscs-rbd device map \
--pool octopuscs-rbd-pool octopuscs-volume
[root@node1 ~]# rbd showmapped
id  pool                namespace  image             snap  device
0   octopuscs-rbd-pool             octopuscs-volume  -     /dev/rbd0

[root@node1 ~]# mkdir -p /mnt/ceph-rbd
[root@node1 ~]# mount /dev/rbd0 /mnt/ceph-rbd/
[root@node1 ~]# df -h
Filesystem             Size  Used Avail Use% Mounted on
/dev/rbd0               30G   20G  8.9G  69% /mnt/ceph-rbd

[root@node1 ~]# ll -h /mnt/ceph-rbd/
-rw-r--r--. 1 root root 20G Jan 26 10:27 pi-digits-1m-20gb.txt
Next, generate a checksum and copy it into the first node. This might take a few minutes to complete.
[root@node1 ~]# sha1sum /mnt/ceph-rbd/pi-digits-1m-20gb.txt | \
cut -f 1 -d " "  > ~/pi-digits-1m-20gb-checksum-transfered
[root@node1 ~]# scp ~/pi-digits-1m-20gb-checksum-transfered root@bastion:/root/pi-digits-1m-20gb-checksum
SSH back into bastion and compare the checksums. If they are the same, the ‘diff’ command will show no output, and it will mean that the data was not corrupted/changed during transfers.
[root@node1 ~]# exit
[root@bastion rbd-clients-packages]# cd ~
[root@bastion ~]# ll
-rw-r--r--. 1 root root      64 Jan 26 10:39 pi-digits-1m-20gb-checksum
-rw-r--r--. 1 root root      78 Jan 26 11:14 pi-digits-1m-20gb-checksum-transfered
[root@bastion ~]# diff pi-digits-1m-20gb-checksum pi-digits-1m-20gb-checksum-transfered
Summary
In this guide, we learned how to deploy an RBD block storage solution on a Red Hat Storage Ceph cluster. To advance the cluster’s capabilities further, check out our other guides on How to Deploy Object Storage on Red Hat Ceph Storage Cluster, and How To Use REST API with RADOS Gateway.
Make sure to check out the Red Hat Docs for the complete configuration options for your Ceph cluster.