
Introduction
In a Red Hat Ceph Storage cluster, object storage is provided by the RADOS Gateway (RGW). It provides an S3-compatible interface that translates RESTful API requests into the cluster’s RADOS format.
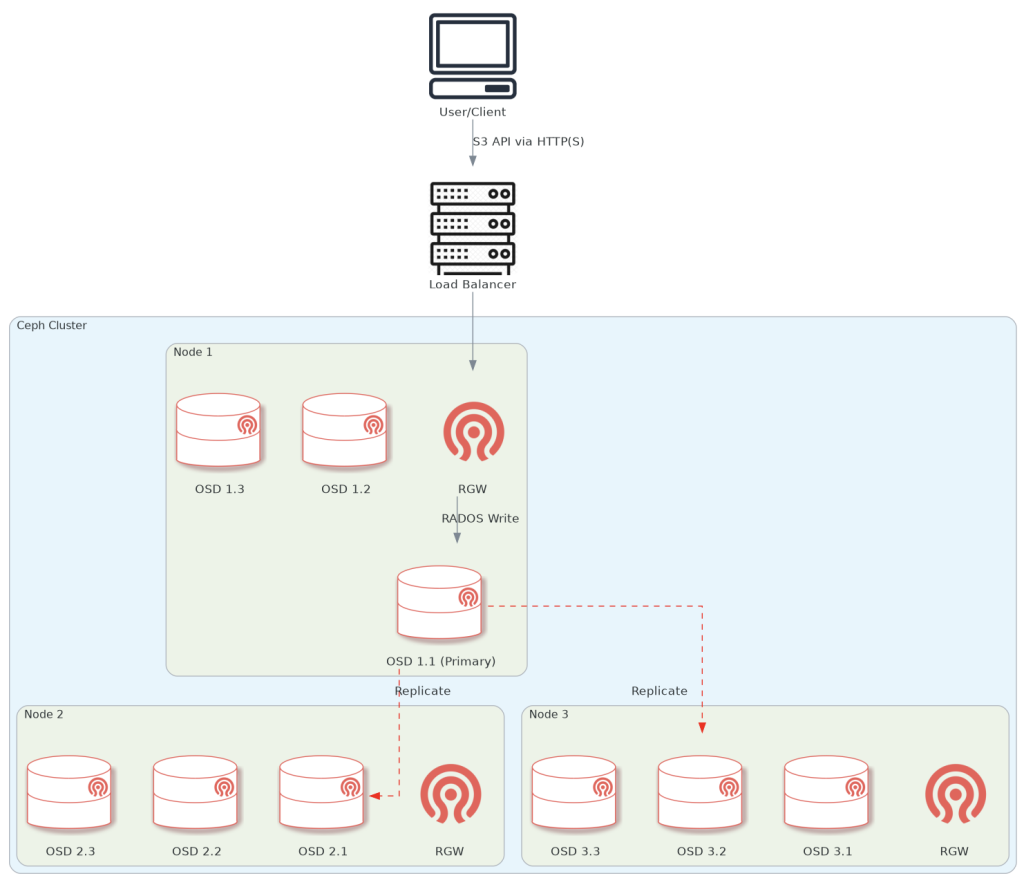
Diagram of the end-to-end data flow-path when using object storage on Ceph.
The client sends the data via the loadbalancer, which is configured to choose one of the nodes with an RGW on them (in our case, all 3 storage nodes have one). Then, the RGW performs the write using ‘librados’ to a primary OSD calculated by the CRUSH algorithm. The primary OSD simultaneously replicates the data to n other OSDs in the PG (depends on configuration, default is 3).
NOTE: The node/OSDs mumbers are arbitrary, and in reality, the loadbalancer points to ALL configured RGW nodes, not just one.
The following section will show you how to deploy object storage in a Red Hat Ceph Storage cluster.
This guide assumes you have a Red Hat Ceph Storage cluster set up. If not, check out our other guide on How to Deploy a Red Hat Ceph Storage Cluster in an Air-gapped Environment.
Procedure
Deploy RGW on the nodes
Label the nodes:
[ceph: root@node1 /]# for node in node1 node2 node3; \
do ceph orch host label add $node rgw; done
Deploy the RGW daemon on the nodes:
[ceph: root@node1 /]# ceph orch apply rgw rgw-octopuscs \
--placement="label:rgw"
NOTE: This command might take a few minutes to complete.
Verify that the deployment worked:
[ceph: root@node1 /]# ceph orch ls
NAME                       PORTS  RUNNING  REFRESHED  AGE  PLACEMENT
...
rgw.rgw-octopuscs            ?:80       3/3  7s ago     9s   label:rgw

[ceph: root@node1 /]# ceph orch ps --daemon_type=rgw
NAME                           HOST  PORTS  STATUS
rgw.rgw-octopuscs.node1.aqbnrg  node1  *:80   running (49s)
rgw.rgw-octopuscs.node2.hyjmrr  node2  *:80   running (42s)
rgw.rgw-octopuscs.node3.nynnyr  node3  *:80   running (36s)
Install the LoadBalancer
On bastion, download the HAProxy package and any required dependencies. Then, copy it to the loadbalancer
[root@bastion ~]# mkdir -p ~/ceph-cluster-packages/loadbalancer-packages/haproxy && cd ~/ceph-cluster-packages/loadbalancer-packages/haproxy
[root@bastion haproxy]# dnf download --resolve haproxy
[root@bastion haproxy]# scp haproxy-<version>.rpm root@loadbalancer:/root
Install the HAProxy package on the loadbalancer node.
[root@bastion haproxy]# ssh loadbalancer
[root@loadbalancer ~]# ll
-rw-r--r--. 1 root root 2615238 Jan 22 11:13 haproxy-<version>.rpm

[root@loadbalancer ~]# dnf install -y ./haproxy-<version>.rpm
Configure HAProxy to serve the OSD nodes
Backup the original haproxy.cfg and replace the contents with the below configuration
(replace <value> with your values).
[root@loadbalancer ~]# cp haproxy.cfg haproxy.cfg.backup
[root@loadbalancer ~]# cat haproxy.cfg
# HAProxy configuration
# ---------------------

defaults
  timeout connect 10s
  timeout client 5m
  timeout server 5m
  timeout http-request 10s
  timeout http-keep-alive 2m

listen stats
  bind *:8080
  mode http
  stats enable
  stats uri /haproxy_stats
  stats auth admin:<secure-password> # Replace with your password
# ---------------------------------------------------------------------

# S3 Object Storage Frontend (Public Facing)
# ------------------------------------------

frontend rgw_frontend
    bind *:80
    mode http
    option httplog
    default_backend rgw_nodes
# ---------------------------------------------------------------------

# RGW Backend Nodes (The Storage Nodes)
# ---------------------------------------------------------------------

backend rgw_nodes
    mode http
    balance leastconn
    option httpchk GET /
    # The 'check' parameter tells HAProxy to monitor if the node is alive
    server node1 <node1-ip>:80 check
    server node2 <node2-ip>:80 check
    server node3 <node3-ip>:80 check
Start HAProxy service
[root@loadbalancer ~]# systemctl enable --now haproxyCheck the HAproxy service
You can check connectivity to the cluster via the loadbalancer. You can use bastion for this.
[root@bastion ~]# curl http://loadbalancer
<?xml version="1.0" encoding="UTF-8"?><ListAllMyBucketsResult xmlns="http://s3.amazonaws.com/doc/2006-03-01/"><Owner><ID>anonymous</ID><DisplayName></DisplayName></Owner><Buckets></Buckets></ListAllMyBucketsResult>
Using the Object Storage on a Red Hat Ceph Storage Cluster
In this section, we will showcase how to store files in our Red Hat Ceph Storage cluster using the AWS S3 API. For that, we need to create an S3 entity in our Red Hat Ceph Storage cluster to make authorized requests, and an S3-compatible API tool for read/write operations. We will use the s3cmd tool.
Create a New radosgw Entity
[root@node1 ~]# cephadm shell
[ceph: root@node1 /]# radosgw-admin user create --uid=s3admin \
  --display-name="S3 Administrator" \
  --access-key=<access-key> --secret=<secret>
Install and Configure the s3cmd Tool
On bastion, download the s3cmd repository.
[root@bastion~]# cd /etc/yum.repos.d/
[root@bastion~]# wget http://s3tools.org/repo/RHEL_6/s3tools.repo
Install the s3cmd tool:
[root@bastion~]# dnf install -y s3cmd
[root@bastion~]# s3cmd --version
s3cmd version 2.4.0
Configure s3cmd to point to your local S3 object storage:
(replace <value> as needed)
[root@bastion ~]# s3cmd --configure

Enter new values or accept defaults in brackets with Enter.
Refer to user manual for detailed description of all options.

Access key and Secret key are your identifiers for Amazon S3. Leave them empty for using the env variables.
Access Key: <access-key>
Secret Key: <secret>
Default Region [US]: default

Use "s3.amazonaws.com" for S3 Endpoint and not modify it to the target Amazon S3.
S3 Endpoint [s3.amazonaws.com]: loadbalancer

Use "%(bucket)s.s3.amazonaws.com" to the target Amazon S3. "%(bucket)s" and "%(location)s" vars can be used
if the target S3 system supports dns based buckets.
DNS-style bucket+hostname:port template for accessing a bucket [%(bucket)s.s3.amazonaws.com]: loadbalancer/%(bucket)s

Encryption password is used to protect your files from reading
by unauthorized persons while in transfer to S3
Encryption password:
Path to GPG program [/bin/gpg]: <Enter>

When using secure HTTPS protocol all communication with Amazon S3
servers is protected from 3rd party eavesdropping. This method is
slower than plain HTTP, and can only be proxied with Python 2.7 or newer
Use HTTPS protocol [Yes]: No

On some networks all internet access must go through a HTTP proxy.
Try setting it here if you can't connect to S3 directly
HTTP Proxy server name: <Enter>

New settings:
  Access Key: <access-key>
  Secret Key: <secret>
  Default Region: default
  S3 Endpoint: loadbalancer
  DNS-style bucket+hostname:port template for accessing a bucket: %(bucket)s.s3.amazonaws.com
  Encryption password:
  Path to GPG program: /bin/gpg
  Use HTTPS protocol: False
  HTTP Proxy server name:
  HTTP Proxy server port: 0

Test access with supplied credentials? [Y/n] Y
Please wait, attempting to list all buckets...
Success. Your access key and secret key worked fine :-)

Now verifying that encryption works...
Not configured. Never mind.

Save settings? [y/N] y
Configuration saved to '/root/.s3cfg'
Modify the newly created s3cmd file (this change is necessary because s3cmd defaults to look for buckets in Amazon’s AWS, and not locally):
[root@bastion ~]# sed -i 's|host_bucket = .*|host_bucket = loadbalancer|g' ~/.s3cfgCreate an S3 bucket
[root@bastion ~]# s3cmd ls
[root@bastion ~]# s3cmd mb s3://octopuscs-storage
Bucket 's3://octopuscs-storage/' created
[root@bastion ~]# s3cmd ls
2026-01-25 15:15  s3://octopuscs-storage
Verify that the bucket can store/retrieve data
For this, we are going to create a 10 GiB ’empty’ file on our bastion. Make sure your bastion has enough storage to accommodate this file. Notice the OSD’s utilization before and after.
[ceph: root@node1 /]# ceph osd df
ID  CLASS  RAW USE  DATA     META     AVAIL    %USE
 2    hdd  104 MiB  3.7 MiB  101 MiB  50 GiB  0.20
 5    hdd  108 MiB  3.7 MiB  105 MiB  50 GiB  0.21
 8    hdd  101 MiB  4.2 MiB  97 MiB   50 GiB  0.20
 0    hdd  104 MiB  3.7 MiB  101 MiB  50 GiB  0.20
 3    hdd  105 MiB  4.3 MiB  101 MiB  50 GiB  0.21
 6    hdd  108 MiB  3.7 MiB  105 MiB  50 GiB  0.21
 1    hdd  100 MiB  3.7 MiB  97 MiB   50 GiB  0.20
 4    hdd  104 MiB  3.7 MiB  101 MiB  50 GiB  0.20
 7    hdd  109 MiB  4.3 MiB  105 MiB  50 GiB  0.21
 TOTAL     946 MiB  35 MiB   911 MiB  449 GiB 0.21
On bastion, create test directories. Then, create an a 10 GiB file. The command might take a few minutes to complete.
[root@bastion ~]# mkdir -p /tmp/test/{put,get} && cd /tmp/test/put
[root@bastion put]# dd if=/dev/zero of=/tmp/test/put/big-file bs=4M count=2500
...
10485760000 bytes (10 GB, 9.8 GiB) copied, 8.43405 s, 1.2 GB/s
Upload the file to the Ceph S3 bucket.
[root@bastion put]# s3cmd --acl-public put /tmp/test/put/big-file s3://octopuscs-storage/
...
upload: 'big-file' -> 's3://octopuscs-storage/big-file'  [part 667 of 667, 10MB] [1 of 1]
 10485760 of 10485760   100% in    0s    18.25 MB/s  done
Public URL of the object is: http://loadbalancer/octopuscs-storage/big-file

[root@bastion put]# s3cmd ls s3://octopuscs-storage
2026-01-25 15:31  10485760000  s3://octopuscs-storage/big-file
Check OSD’s utilization now.
Notice that even though the file is 10 GiB, the ‘DATA’ column shows ~30 GiB usage. That is because Ceph’s default configuration is to replicate any data in any pool 3 times.
[ceph: root@node1 /]# ceph osd df
ID  CLASS  RAW USE   DATA      META      AVAIL    %USE
 2   hdd   2.6 GiB   2.5 GiB   118 MiB   47 GiB   5.29
 5   hdd   4.0 GiB   3.9 GiB   132 MiB   46 GiB   7.97
 8   hdd   3.5 GiB   3.4 GiB   136 MiB   46 GiB   7.04
 0   hdd   3.9 GiB   3.7 GiB   132 MiB   46 GiB   7.73
 3   hdd   3.5 GiB   3.4 GiB   158 MiB   46 GiB   7.04
 6   hdd   2.8 GiB   2.7 GiB   130 MiB   47 GiB   5.62
 1   hdd   2.3 GiB   2.2 GiB   126 MiB   48 GiB   4.64
 4   hdd   6.3 GiB   6.1 GiB   175 MiB   44 GiB   12.60
 7   hdd   1.6 GiB   1.5 GiB   114 MiB   48 GiB   3.14
TOTAL      31 GiB    29 GiB    1.2 GiB   419 GiB  6.79
Next, pull the file from the S3 bucket back to the bastion node.
[root@bastion put]# rm /tmp/test/put/big-file
[root@bastion put]# cd /tmp/test/get
[root@bastion get]# wget http://loadbalancer/octopuscs-storage/big-file
--2026-01-22 13:21:36--  http://loadbalancer/octopuscs-storage/big-file
...
HTTP request sent, awaiting response... 200 OK
Length: 10485760000 (9.8G) [binary/octet-stream]
Saving to: ‘big-file’

big-file                              100%[==============================================>] 9.77G  85.3MB/s    in 2m 6s

2026-01-22 13:23:42 (79.4 MB/s) - ‘big-file’ saved [10485760000/10485760000]

[root@bastion get]# ll
total 10240000
-rw-r--r--. 1 root root 10485760000 Jan 22 13:05 big-file
Remove the file from bastion and from the S3 bucket
[root@bastion get]# rm big-file
[root@bastion get]# s3cmd ls s3://octopuscs-storage
2026-01-25 15:31  10485760000  s3://octopuscs-storage/big-file

[root@bastion get]# s3cmd rm s3://octopuscs-storage/big-file
[root@bastion get]# s3cmd ls s3://octopuscs-storage
(no output)
Clean the bucket with Garbage Collector
On node1, manually trigger Ceph’s garbage collector.
[root@node1 ~]# cephadm shell
[ceph: root@node1 /]# radosgw-admin gc process --include-all
NOTE: Be careful running this on a production cluster. Running
gc processmanually will cause a performance hit.
Summery
In this guide, we learned how to deploy object storage solution on a Red Hat Storage Ceph cluster. To advance the cluster’s capabilities further, check out our other guides on How to deploy RBD storage on a Red Hat Ceph Storage Cluster, How to Deploy a Multi-Site Ceph Object Gateway, and How To Use REST API with RADOS Gateway.
Make sure to check out the Red Hat Docs for the complete configuration options for your Ceph cluster.